Pages

Monday, November 30, 2015

Burrrr...sending my love across the miles


My wintery penguin card was featured on the IMAGINE Crafts blog over the weekend!  It's a very dimensional card (that shows up better in the photo below) yet is still flat enough to be easily mailed to send your love across the miles!


You can see complete instructions, photos and supply list here: Across the Miles.

I also wanted to mention that this card is the inspiration for Decembers Mixed Media Calendar page...  A faithful reader reminded me that we still needed to complete December - eek!  Too many irons in the fire - I totally forgot about it but I will be sharing that page with you tomorrow.

Have an inky evening friends!

Friday, November 27, 2015

8 Years Today!

8 years ago today I started Ink Stains!  I wanted it to be a place to share a variety of projects, techniques and cards with friends.  A place where you can learn without having to shell out loads of $$$$$ just to see how someone did that.  I wanted it to be a place that people would look forward to visiting to see what I was up to next.

3,113 posts later I hope that I've done what I set out to do but only you can tell me if I have succeeded or not.  

There are days I wonder if anyone is listening, days I can't wait to share what I've made or a fun new way to use a product and even days I come home and wonder if anyone would miss me if I never posted again but every once in a while someone will send me an e-mail or post a comment that boosts my spirits and pushes me onward.  It's nice to know that I make a difference in your artistic life and I hope that I can continue to shine a little light on your days for many long years to come.

For now though I'd like to celebrate the first 8 years with a fun giveaway for you!

You don't have to jump through hoops to be entered to win...simply post a comment.  It can be just your name (with a way to contact you), you can tell me about a favorite project/technique you've seen here, you can tell me how long you've been visiting or maybe something you'd like to see.  Whatever it is, just post to be entered to win.  I know there are people out there because the blog is up to a little over 3,250,00 views and a few thousand visits per day ... so let's here from you!  You deserve a shot at winning :)

What will you win?  Well, I have a collection of what I hope you will find to be fun goodies.....


A couple nifty new adult coloring books - 
Mandala Wonders and Kaleidoscope Wonders...


Some fun brands and embellishments, 
one of my favorite die-sets - Scallop Ovals


And one of my favorite new-ish (to me) color mediums
a set of 24 Brusho Colour Crystals!

I also have a selection of other fun goodies pulled from my ephemera collection too!

You have until December 5th to post your comment to be entered to win!

Good Luck Everyone 
and
thanks for 8 wonderful years!!

Thursday, November 26, 2015

Happy Thanksgiving Everyone!!


May you all enjoy a blessed day with family and friends


today and through the coming year.


Thanks for all of you - my Ink Stained Friends! 


Happy Thanksgiving!!!

Wednesday, November 25, 2015

Moroccan Spice - Live Life with a Little Spice!

Today we're living life with a little spice as today is the November Club Scrap Blog Hop!  Can you believe it's that time of the month already?  Well it is and I'm so tickled to share this months kit and project with you!  This months kit - Moroccan Spice is just beautiful - think vintage spice bazaar.  


Live life with a little spice.   This frame was so much fun to make. It was a bit time consuming because of all of the fussy cutting but it was so worth it I think.  


I wanted to give each of the little tiles a genuine tile look so I covered each with a coat of Crystal Lacquer.  I wish I could better share the shine and dimension created by the CL.  It really does add so much to the finished frame.  Friday I'll be sharing the step by step details on how I created the frame.


I also made a Gothic Arch using one of my Gothic Arch Templates - Fancy Gothic Arch #2.  I thought the sentiment was perfect for out Thanksgiving get-together - I'm going to tuck it somewhere for all to see. 

I want to thank you all for stopping by and I'd also like to wish those of you in the United States a very happy Thanksgiving and to everyone else - have a wonderful day!

Your next stop on the hop is 


if you get lost along the way or you'd like to see the complete list of artists participating in today's hop you can find it here - 


Tuesday, November 24, 2015

Copper Waves of Grain

A card today made using one of my favorite mediums - Metallic Flakes in my favorite metallic color - COPPER!  It's such a warm and deep rich color - perfect for Autumn and Thanksgiving cards.  


The card was stamped using IMAGINE Crafts Essential Glue Pad then sprinkled with the flakes.  When it was dry I gently rubbed away the excess flakes and tada!  Copper Waves of Grain!  So easy but it makes such an impact.

Is everyone ready for Thanksgiving???  I still need to do a bit of shopping but I'm almost ready.

Monday, November 23, 2015

Easy Wreath Christmas Card - Color Choice

Happy Monday - hope everyone who had to deal with the snow over the weekend is safe and sound and more importantly warm!  Burrrr...it's been a cold one but they say it's going to warm up by Thanksgiving!

Today I have a Christmas card for you that was wicked fun to make!  I am having so much fun with them I think I may be making several more to send out....


I took the My Favorite Things Wreath and cut it several times - I started with a brown one then added 4-5 additional green ones over top, added a bow and stamped the sentiment.  Easy peasy.  Best part is that it looks so darn cute!  It's very dimensional but nothing that will impede sending it through the mail which is nice.  So many times you get bulky cards which are just impossible to mail.


After I finished the first card I was wondering what it would look like on black so initially I embossed the sentiment then again piled on the die-cut wreaths - same colors as on the white one then added the bow.  These were so quick, it only took like 10 minutes to die-cut and assemble both cards - less that that actually because I got a phone call in between so really about 8 minutes.  AND you can use up scraps of green cardstock you have laying around!


I know black isn't traditionally thought of as a Christmas color but personally I like it.  
Which one do you prefer?  I'd love to hear your thoughts.

And this weeks challenge over at CAS on Sunday is #72 - Christmas so I'd like to enter these cards into their challenge!

Sunday, November 22, 2015

First Snow of Winter 2015/2016

Well, the weathermen finally got it right.  We got our first snow of this winter Saturday!  At first they were calling for a couple inches, then we went to a winter storm watch with 4-6" possible then a bit before noon yesterday they said we were under a Winter Storm Warning with 4-7" possible, more in the northern areas (which we are).

And here's what we got...


This was about 3:30 - it continued snowing until about 8:30 or 9:00 last night so we got quite a bit more.


The big oak behind us looks so pretty when covered in snow.


You can't really tell from the photo but there were loads of birds hiding in the branches of that row of pine trees...I could hear them but couldn't see them.


Graber wasn't too thrilled about being out in it.
He's a jack russell/rat terrier mix so he doesn't have a whole lot of padding or fur.


Cecil on the other hand loved it!
He snow plows paths for the other 2 dogs.

No picture of Fidget (cairn terrier) - he went out then right back in...
Not interested in the snow at that point - can't say that I blame him.

I didn't go out at all - after falling & breaking my leg in late January I have no interest to be out in the snow/ice!  I normally love winter but after falling it just scares the heck out of me.  I don't know what I'm going to do as we'll have another 4-5 months of it - EEK!

Anyway, that's a gimps of our first snow of the year!


Friday, November 20, 2015

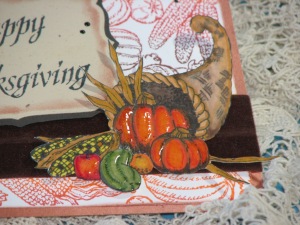
Happy Thanksgiving Cornucopia Card

Today my Thanksgiving Cornucopia card is posted over on the IMAGINE Crafts blog!   I used one of the Kaliedacolor Ink Pads for the background!  I just love those pads - so easy to get a great looking fade going.


For complete instructions on how I made the card, step by step instructions and a complete supply list check out - Harvest Cornucopia Thanksgiving Card.  

2015_November_RJ_Thanksgiving_10

You'll see how I added a bit of shine to a few of the harvest goodies.
Hope you stop by and check it out!


Santa Owl - CAS Style

Today I have a fun little card for you with an image I love...Santa Owl (Stampendous).  Well the challenge over at "Less is More" this week was a one-layer Santa card which of course had to be CAS (difficult for me).  I knew this little guy would be perfect and this is what I made...


He was stamped on to a piece of cardstock (CS) with Memento Tuxedo Black ink.  I then colored him with a variety of Memento Dual Tip Markers, a few highlights with a white gel pen and then topped off his hat with White Radiant Neon Amplify medium which puffs when heated.

I stamped the sentiment and thought I was done but it was just sooooo clean I couldn't resist, I just had to add a bit of doodling in the upper right hand corner of the card.  


Here's a close up of the little guy...
Such a sweetie :)


Supplies:

Stampendous - Santa Owl
Woodware Craft Collection - Sentiment
IMAGINE Crafts featuring Tsukineko - Memento Ink - Tuxedo Black; Memento Dual Tip Markers - Lady Bug, Rhubarb Stalk, Tangelo, Desert Sand, Toffee Crunch, Peanut Brittle, Rich Cocoa; Fabrico Marker - Apricot; Radiant Neon Amplify - White
ClubScrap.com - Cardstock
Sakura - Gelly Roll White Gel Pen

Thursday, November 19, 2015

Framed Dies - One Cut, Two Cards or more!

I am so excited...this week my frame dies from MFT arrived!  I have been wanting these for quite some time but they are expensive.  I've not felt I could purchase them until I rec'd an e-mail that MFT was having a bundle sale!  Well, I jumped right on it and now I have a couple of fun cards I made using just a single cut!

Here are the 2 cards I made....

\

This Thanksgiving card was made using the larger frames that are meant to be used from the dies.  The sentiment (ClubScrap.com) and outside edge of the card were embossed with Gold ep by IMAGINE Crafts.  


This card was created with the "waste" between the frames I cut....meant to be discarded but why when you can create such a fun card with them!   The background was stamped with VersaMark ink then dusted with Rich Gold PanPastel.  The sentiment was stamped with Elderberry Memento Ink.


And here's how I did it.  I carefully taped the dies down one by one to my cardstock - starting with the largest die I then positioned the middle sided die so it was almost exactly in the center of the first.  I then positioned and taped the smallest die.  Once cut you're left with so many fun die-cuts to use on a variety of cards.  I didn't think about it at the time but you could even trim your original piece of cardstock so it could be used over a card as well.  So many possibilities with little to no waste!  Gotta love it.

Supplies:

MFT - Frame Dies
ClubScrap.com - Papers, Stamps, Fiber
Sizzix - Leaf Die
PanPastels
IMAGINE Crafts featuring Tsukineko - VersaMark ink; Gold Embossing Powder; Memento Ink - Elderberry 

Wednesday, November 18, 2015

Shrink Plastic Pendant Idea

Recently I saw a lovely clay pendant piece on an Art Charm group I'm a member of on FB and I thought - gosh I bet I can make that from black shrink plastic so I decided to give it a try.  I pulled out my shrink film here's what I came up with!  The one on the left is what I made and the one on the right was the inspiration.


The shape isn't quite right but it's pretty close for a first try.  I didn't have any stamps that matched the design but I had some stencils that got pretty close.  Here's what I did....


I started off by cutting out a shape I thought would work.  I needed a more pointy end on the right but wasn't sure what the shrinking would do to it.  If I made another I would extend that point a bit and make it not so fat.


Next, a bit of Cotton White Opaque StazOn ink pounced through a few different stencils.  I love the swirl design and added some grungy lines just because I liked them.


Next - heat tool and skewer.  I heated up and shrank the film until it was almost down to the finished size.  I then quickly rolled the hot film around the skewer like the original pendant looks.  Be VERY careful - it's HOT!!


Once I had it wrapped around the skewer I let it cool.  I then re-heated just the bottom dangle portion and shaped it as desired.  I like how it turned out and think I might make a few for gifts this year!

Supplies:

Imagine - StazOn Ink - Cotton
Grafix Shrink Film - Black

Tuesday, November 17, 2015

Keep Calm and Bake Cookies!

This month the Club Scrap Artist Team Challenge was to make a project of our choosing using one of the following - Homemade Holiday or I'll be Gnome for Christmas (shown at the bottom).  I couldn't decide which set to use so I made something using each set.

The first project was made using Homemade Holiday - it's a little recipe book I made for my youngest son and his fiance.  She likes to bake so I thought it would be fun for them to try a variety of cookie recipes and decide which were their favorites.  


The album it's self  was made using a Twinchie Album Kit with 2 sets of 4x4" page protectors. The paper was from the Homemade Holiday paper kit from 2014.


The first page of the album is where I put a little note on the back to them and I chose to hand write the title because I'm hoping this will be come something they keep and pass along to their kids.  I know I would love to have pieces of my grandparents handwriting to cherish so maybe...


I stamped each piece of cardstock with a variety of stamps from the collection... they can write the ingredients on one side and baking instructions on the other or however they like.


I just thought it would be a fun tradition for them to start off their life together.


And of course you all know how much I love my Gnome friends so I had to make a card using Mrs. Gnome....  She was colored with Chameleon Pens.

And here's a gander at the stamp sets we were challenged to use.....


and


I already had both of these sets in my stamp collection so I am lucky enough to be able to offer up a set of each stamps to a couple Ink Stained readers!!  Simply leave a comment telling me about one special holiday tradition in your family....  It could be baking special cookies, a story about ornaments, special get-togethers, a sing-along, etc.  Whatever you and your family do to celebrate this lovely time of the year.

You have until 11-28 to post a comment to be entered to win.  
At that time I will draw 2 lucky winners name from a hat 
(o.k....really random.org will draw the winners).

Good Luck Friends!!!

Monday, November 16, 2015

One Line Watercolor Technique

I'm sure most of you are wondering what the heck I'm talking about....One Line Watercolor.  Well it was inspired by Novembers Technique Challenge at Club Scrap - watercoloring a stamped image with watercolor pencils.   I decided to challenge myself and use only single lines of color for each section of the stamp I wanted to color.


Here is the first card I made...


You simply stamp it in a lighter colored ink - in this case Pistachio.


Trace the image with desired colors using watercolor pencils.  You don't even have to fully trace the image as the watercolor media and paint can be easily spread around.  Once you've got the image colored the way you'd like, use a waterbrush or paintbrush and water to blend and move the watercolor around.  I've used Inktense watercolor pencils for todays projects.


I had so much fun with the first I made another...


This image was stamped with Grey Flannel Memento Ink. Since the sun was so big I added more than a single line of color in the upper left corner but not much.  The rest of the image is all single lines of watercolor pencil.


And wet to blend.


And finally my third.  


This time I stamped with VersaMark ink - yes, my pad is a bit dirty which is why you can see it.  That's why I used that particular pad.


Single lines of color...


And blend!

It really is such a fun technique and once you get going it goes very quickly.  The hardest part is choosing the colors - LOL!!  After that it's a breeze!  I hope you give it a try.


Supplies:

Club Scrap.com - Rubber Stamps, Cardstock
Watercolor Paper
Inktense Watercolor Pencils
Niji Waterbrush