Pages

Monday, August 31, 2015

Stencil Challenge Winner!

If you recall a couple weeks ago I posted this canvas I made as part of the Club Scrap Artist Team Challenge - Stencils & Masks.


I had a set of stencils and masks for one winner who guessed the number of stencils and masks used to create this canvas.  I showed several in the instructions but I left one out...if you notice in the background - especially on the left side of the canvas by the lady's hand you can see faint stripes - those are made by spritzing Fireworks! Spray over a 7th stencil!  So the correct answer was 7.

There were 5 people who guessed correctly and I drew a name out of the hat to determine the winner and that winner is.....


Great canvas! So beautiful! I count 6, but I am thinking there's another one, so 7.

Congratulations Rettaescape!!!
Please e-mail me your snail mail addy so I can mail out your envelope of stencils and masks.

Wonderful Woman!


You are wonderful!!

Friday, my Girl Power - Wonder Woman card was posted on the IMAGINE Crafts blog. I normally don't stamp lots of people so this was a bit out of the box for me.  I so love how she turned out. The main image was stamped with Memento Tuxedo Ink then water colored with a variety of Memento inks.  The gold on her belt, wristletts and head band are Delicata Golden Glitz ink.  She was then cut out and mounted on a piece of Vertigo Film.  

The background panel was a monoprint of a mix of different Memento Inks and stamped over and over with the "Girl Power" stamp.

Finished it off with a few irRESISTible Pico Embellisher dots, dashes and swirls.

Supplies:

IMAGINE Crafts featuring Tsukineko - Memento Dye Inks, Delicata Golden Glitz, Vertigo Film, Fireworks Spray, 
Unity Stamp Co - Stamps
ClubScrap.com - Cardstock
Niji Waterbrush

Friday, August 28, 2015

Feather Fun

Today I wanted to share some fun I recently had with some new feather stamps....


This first card was stamped on cardstock that I had colored using the mono print technique using a variety of brown Memento inks.  I fussy cut each feather and tied them together with a bit of twine.  The card was stamped with a cheescloth type background stamp and the sentiment both in brown ink.  I affixed the feathers then added a few dots of Bronze Pico Embellisher.  


This next card is one of my fav....I stamped and embossed the feather with white embossing powder, used a circle template to ink a highlight circle over the feather and then stamped the sentiment in a darker shade of purple Memento ink.  I added a few dots of Sparkle Pico Embellisher for a little glitter here and there.


O.k...I have to admit, this isn't really a feather but it looks like one to me.  It's actually an Evergreen Sprig but hey...I say feather ;)  SO anyway, I wanted to take the basic design from the Purple card above and turn it into a card for Autumn.  And here's what I came up with!  I used 3 circles this time with fall colors - Morocco, Bamboo Leaves and Peanut Brittle.  It was also spritzed with Bronze Pico Embellisher for some shimmer.


Now this one IS my favorite feather card....The black feather was stamped & embossed directly on the card panel.  I then used the sponge dauber to apply 2 different colors of grey Memento Ink over top.  I then stamped a second feather using Silver ep on white cardstock; fussy cut and mounted it over the black feather.   I love the stark contrast between the two.  A few neutral colored sequins finishes off the look.

Supplies:

JFF Stamps - Balsam BranchStamptangle Feather 1; Stamptangle Feather 2Stamptangle Feather 3Fiber Background; sentiments;
IMAGINE Crafts featuring Tsukineko: Memento Dye Inks, Embossing Powders, Pico Embellisher, Pico Texture Spray
Cardstock, Sequins, ribbon, Circle Stencil

Thursday, August 27, 2015

Gothic Arch Clock Instructions

Yesterday I shared my Club Scrap - Woven Strands Gothic Arch Clock.  Today I'm going to share how I made it!


Directions:


1. Cut Book Board to length and gently bend and form the top of the arch.  This is all personal preference.  You can bend it more for a wider arch or just a bit for a tall skinny arch.  


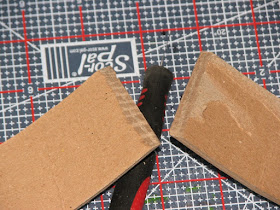
2. Miter the top edges at an angle where the two pieces of book board meet.  This will make the point of the arch come together nicely once glued in place.


3. Glue the two arch pieces together and then glue on the bottom of your arch.  Let it set and dry completely.


4. Cover the inside of the arch with desired color of paper.


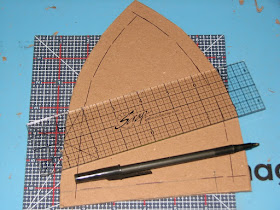
5. Place the arch frame on a piece of book board and trace - this will be the back of your arch.


6. Trace a little door on the back piece.  This will give you access to the clock mechanism once finished.


7. Cut the door, sand all edges and make a little crescent at the bottom for access.


8. Flip the arch and trace on a second piece of book board to create the frame. I wanted my frame 1/2" wide so I used a ruler and marked 1/2" increments out along each side.


9. Cut out the excess book board.  Sand all edges of the book board.


10.  Finally trace the inside of the arch on a third piece of book board.  This will become the inside panel of the clock arch where the clock mechanism will be mounted.


11.  Cover the bottom. of the Arch with desired color of pattern paper.

12.  Punch 4 holes in the bottom of the arch.


13. Insert feet - and screw them on tightly.  I am using Steel High Crown Acorn Nuts & Screws. There is a story behind those but I'll share that another day.


14. Determine how much room you are going to need between the center panel and the back of the arch.  Build up 3 or 4 "risers" out of left over book board.  I needed 1" risers to allow the clock mechanism to clear the back of the clock so I glued together 5 pieces of book board to get the correct height.  Once they dry, glue them to the Gothic Arch Frame.

Now I know these don't look the best but nobody is going to see them so it's o.k.


15, Cover the inside panel with desired paper.


16. Install clock mechanism, clock hands and add any embellishments as desired.


17. Glue the clock face into the arch frame.


18. To cover the seam between the clock and frame I glued in a bit of fiber.


19. Cover the back panel and access door with desired color of paper.  Use a mini hinge to attach the door to the back panel.


20. Glue the back panel to the arch frame and let it dry completely.


21. Cover the front frame with desired color of paper.  In order to make the curve you'll have to put several relief cuts along both the inside and outside edges of the paper.


22. If desired, stamp and emboss the frame.


23. Trace and cut a piece of acetate to act as a "glass" front of your clock.  Glue it to the frame.


24. Glue the frame/glass to the front of the Gothic Arch.


25. Cover the sides of the frame with desired color of cardstock.


26. Make embellishments as desired for the sides of the arch.


27. Affix the embellishments to each side of the Gothic Arch Clock frame and YOU'RE DONE!!!  Pop in a battery and enjoy your new clock!!


I know it sounds like a LOT of work but 
it's really very easy and the results are well worth it.  
So much so I may make a couple more for Christmas gifts!!

I hope you've enjoyed this project and give it a try yourself.

Supplies:
ClubScrap.com - Papers, Book Board, Glue, Rubber Stamps, Fiber
IMAGINE Crafts featuring Tsukineko - VersaMark, Gold Embossing Powder, Memento Dye Ink
Hobby Lobby - Clock Mechanism
Personal Stash - Acetate (from left over packaging), Mini Hinge, Mini Screws, Acorn Nuts & Screws

Wednesday, August 26, 2015

Woven Strands Club Scrap Blog Hop!

Woo Hoo...I am so excited about this months Club Scrap Blog Hop - Woven Strands!!!  I knew exactly what I wanted to create when I saw the kit...the only question was would I actually be ABLE to make it.  This months kit is very Celtic in design with lots of beautiful Celtic knots and images.  The first thing that came to my mind was Gothic architecture...with led to Gothic arches and this months creation a Gothic arch clock!


And here it is!!!  I made it completely from scratch.  I used book board for the foundation of the clock then each piece was covered with papers from the Woven Strands kit, the embellishments on the face and side of the clock also come from the kit.    The front frame and embellishments inside were stamped and embossed with gold ep.

The only extra bits were the ink and embossing powders, the clock mechanism, a hinge for the back door and the acorn nuts I used for the clock feet. 


Here's a view of what the sides look like.... These blocks were cut from one of the pattern papers then matted with cardstock from the kit.


And this is the little door I put in the back of the clock so I could get to the clock mechanism to change the time/battery.


And finally the bottom - don't you love those wicked cool feet?   There's a story behind those for another day... I'll have a complete tutorial on how it was made tomorrow in case you're interested in building one for yourself.

Supplies: 
ClubScrap.com - Woven Strands Kit - papers, stamps, embellishments, book board
IMAGINE Crafts featuring Tsukineko - VersaMark, Gold EP, Memento Dye Ink, 
Clock Mechanism, Acorn Nuts, Hinge, acetate (recycled from packaging)

Your next stop on the hop is....


and if you get lost along the way, 
the complete list can be found here -


Have a wonderfully crafty day friends!

Tuesday, August 25, 2015

Pocket Letters

Have you heard about Pocket Letters?  Well they are pretty new - Janette Lane came up with them in late January of this year...  She was actually looking for an inexpensive way to join the Project Life movement and decided to use baseball card album pages.  Here idea grew from there and....  Pocket Letters were born.  I understand that many people are swapping these out like pen pals. But I think it would be fun to just send them to unsuspecting people as a surprise, or as a b-day gift or ????

So, what is a Pocket Letter?  Basically it's a baseball card album page which has 9 slots - these slots just so happen to be the same size as ATC cards!!  SO you fill each of the slots with an ATC and behind each of the ATC's you tuck in little bits, bobs and other goodies your Pal might like.!  Embellishments, stickers, fibers, lace, fabric bits, tea, coffee, candy, mini works of art, altered charms, collage images, etc.  whatever fits in each little pocket is fair game.  

Now I've seen some pocket letters where each pocket is different while other pocket letters follow a theme (disney, travel, flowers, etc.) or a color theme (think R/W/B, Monochromatic, B/W, etc.).   It's all up to the creator.

Sounds like such a fun idea doesn't it?  

Well, I was lucky enough to recently be the recipient of my very first Pocket Letter courtesy of an Ink Stained friend - Diana.  Check it out....


and you flip it over and look at all the fun stuff she included... Ephemera, Fabric Swatch, Metal Filigree pieces, an altered domino, peach tea, a lacy butterfly, animal buttons, mini playing cards and some wicked paper covered buttons.  


SUCH FUN!!!!!!

I'm thinkin' this might be a really nifty swap idea but I wasn't sure if there would be interest or not.  I envisioned this going something like - you sign up for 1, 2, or 3 slots, I match you with 1, 2 or 3 people and then you swap your pages direct.  Somehow it would be nifty if I could get photos of each page swapped and post it all on a single page.  

What do you think?  Give it some thought and either e-mail me or post a comment and let me know what you're thinking.  If there is enough interest we might just have to do this.  I'm very excited now that I actually have one of my very own, I would love share a few of my own creations with others!

Monday, August 24, 2015

Masculine Guy Birthday Card

This weeks challenge over at Just Add Ink is cards for guys and since I live with a house full of them I thought it would be fun to play along!


Birthday Sentiment - Just For Fun Rubber Stamps
Swordfish Stamp - Deep Red Stamps

So here goes...The background is glossy cardstock with a variety of blue alcohol inks swished around here and there.  I added some glitter glue to some of the waves to add a bit of dimension.  I then stamped the swordfish twice, once on the card so I could color in the "splash" and a second time on regular white cardstock.  I colored then cut out the fish.

To give the fish some dimension I cut a slit in the "splash" area, tucked his tail behind the card in the slit and then used a pop dot up by his head to give it the look like he was actually jumping off the card.  It looks so much better in person.


 photo badge1_zpse398c447.jpg

Saturday, August 22, 2015

ATC Swap - Ready to Go!!

Hi Friends - Just wanted to say WOW - I swapped out all of the ATC's today and oh my goodness...what fun!

I have to admit I feel like a slacker - a few people made like 20-30 DIFFERENT ATC's!!  Gosh I felt good about getting the ones made that I did - LOL!!  Whew, I can't imagine coming up with that many different ones.  The cards were all very beautiful - I so can't wait until they start arriving...you are so going to love them :)

Everything will be out in Monday's mail so it shouldn't be too long now. I hope you all enjoy your assortments.  I will be posting photos the week of the 31st.  

Thanks to everyone who joined in on the fun!

Friday, August 21, 2015

Thanks for all you do...

Just playin with my Spectrum Noir Markers today...
coloring and blending.


Supplies: Just For Fun Rubber Stamps
Spectrum Noir Markers
SCACAD - Die

Swap Update

Just wanted to let all the ATC folks out there know that I rec'd the last of the packages last night so I'll be swapping everything out this weekend!

I haven't opened any of the packages yet - wanted it all to be a surprise but I'm sure it will be another wonderful swap.  I will be taking photos of them all and posting in a week or so (to give the packages a chance to arrive at their destinations).

It won't be long now!!


Thursday, August 20, 2015

Follow Me Flamingos

Hope you've had a nice week so far...  Today I wanted to share a couple cards that remind me of my brother...why?  He LOVES flamingos!  Every time I see them he instantly comes to mind.  I'm so going to use this stamp to make his birthday card next year.  Anyway, here you go....

from Just For Fun Rubber Stamps


The background for this card was made using Brusho Colour Crystals - Turquoise and Sea Green. The Flamingos were colored with my Spectrum Noir markers.


The flamingos were watercolored, die-cut then mounted on this fun pattern paper.

Supplies:
Just For Fun Rubber Stamps - Follow Me Flamingos, sentiments
IMAGINE Crafts featuring Tsukineko - Memento Dye Ink
Brusho Colour Crystals
Sectrum Noir Marker
Koi Watercolor
Watercolor Paper, Pattern Paper, Sequins, Fiber

Wednesday, August 19, 2015

Food Saver - Stamp Storage Alternative

Today I wanted to share a storage tip that I've been doing for a while now but just haven't thought to share it until I read a comment on FB about how expensive stamp, die-cut and stencil storage bags are.  For me, clear stamps are always a problem when it comes to storing them.  The cellophane packages that they come in tear easily and just don't last.


Several companies have come out with stamp storage envelopes that are to say the least pricey.   These ones are Simon Says Stamp storage envelopes which are 10.00 for 50.  It doesn't take long to rack up the $'s if you want to store many stamps/dies this way.


The other issue I have with these bags are that not all stamp sets are the same size... It's kind of a waste to use a big bag on smaller sets of stamps.


So, a while ago when I was replacing some of my page protectors I had a thought...  I removed these page protectors from my stamp binders because the holes were getting ready to break through...  If you don't have any used page protectors you can buy the cheap ones for like 12.00 - 200 on amazon  (that's where I get mine - I usually go for the 35.00 & free shipping deal).


So I decided to give something a try and it worked!  What did I do?  Well, to begin with I cut the PP along the binding side from top to bottom.


Then I pulled out my handy-dandy Food Saver...


I measured the page protector to fit my stamp set.


Closed the lid and hit the seal button!


And I had the beginnings of a brand new stamp envelope!


You need to make a second seal close to the first.  This allows you to use the rest of the page protector for a 2nd envelope.  Simply cut between the two seals to separate them.  I usually get 2 larger envelopes or anywhere from 3-6 smaller sized envelopes from a single page protector.


In no time at all you'll have loads of custom fit storage envelopes for virtually any tool in your stash - stamps, dies, stencils, etc.


Normally I don't use the flaps because I have my stamps stored upright in a shoe box sided container but if you want to seal the envelopes I have in the past used my ATG to run a strip of adhesive on the binding strip and used it as a re-sealable closure.


And now all my stamps are safe and sound in their very own custom sized stamp envelopes!  I have been using these for approx. 6 months and so far they have all held up very well.


So there you go - Quick and Easy storage envelopes for 
just a few cents!