Pages

Saturday, November 30, 2013

Viva Las VegaStamps! DT Tryout

Yes, I'm going to give it a shot...
 
Here goes ~
a few of my fav's


and now, why would I like to be a part of the VLVS! DT?
 
 
I would like to be on the VLVS! DT family because of the unique and varied designs they offer.   
I have the ability to play well with others and I design in a wide range of styles which would come in handy since you have thousands upon thousands of stamps to offer.  Not only that but I love to chit chat about stamping (as my readers know) and I love to experiment using my stamps with new techniques on cards, collage, mixed media, altered arts, gifts, jewelry and so much more! 
A stroll through my blog with attest to that.
 
I guess that's it...
Wish me luck friends!

Friday, November 29, 2013

Fun & Easy - Vintage Feel - Bottle Cap Ornaments

Well have you all been Black Friday'ed out?
I didn't actually go shopping but the Black Friday e-mails were enough for me.
I fell prey to a few of them, I know I know...I just couldn't resist!
Far too many good deals to pass up.

Yes, I even did a bit of on-line shopping on Thanksgiving.
There were "pre-BF" sales and a really great coupon for a clothing site I "HAD" to use ;)
So, what did you score today/this weekend?
On to crafting....
I have a fun and easy ornament for you that will not break the bank...
You can use what you have in your stash and have a slew of great ornaments when you're done.
It will lend a wonderful vintage feel to your tree once they are finished.
Here are the ornaments...


The first thing I did was punch two holes in my bottle caps along the edge directly across from each other.  Set it aside for now.


Trim various collage or stamped images...
all of my images are from assorted sheets from Altered Pages.

When I cut them out I left a small tab on the bottom of each image.


Fold that tab under, now your image will stand up on it's own.


Grab those bottle caps, thread one end of wired tinsel (pipe cleaners) into one of the holes and fold it over back into it's self and wrap to secure.  Repeat on the other side. 


This forms a frame and hanger for your ornament.


Give the top of the wired tinsel a twist forming a small loop.
Glue an image into the bottom of the bottle cap.


Fill the bottom of the cap with any fun tiny embellishment you have on hand....
glass glitter, micro beads, sequins, seed beads, mica flakes, glitter, etc. 


For this particular ornament I used a mix of seed beads.


This one was filled with glitter...


Next finish off each ornament with whatever other goodies you can pull from your stash.
A few ideas might be felt, wood, or acetate shapes; ribbons, fibers, small holiday evergreen or holly pieces, more tinsel (around the bottom edge), leaves, flowers fluff, small shape brads, jingle bells, etc.

Here are a few of the finished ornaments up close....

You will notice I bent the wired tinsel into various shapes.
This helps make each ornament unique and gives it a feel all it's own.


Hope you have fun giving them a try!

Thursday, November 28, 2013

Happy Thanksgiving Everyone!!

Hope you have a wonderful (and safe)
 holiday spent with family and friends...


All the best to you and yours!!

Wednesday, November 27, 2013

November Club Scrap Blog Hop - Fire & Ice

Welcome to the
Fire & Ice Blog Hop!

 photo 1113FireIce_HopBadge_rsz_zps4fd1904e.jpg
 
When I saw this months kit I was so inspired by the Asian influence,
I knew I wanted to create something that reflected this theme.


I have always loved origami and thought that I might find something that I could use with these papers.  Of course origami paper is usually very thin so I knew I was in for some work because the Club Scrap papers are so nice and heavy.  I lucked out because a few of the designs were on thinner glossy paper which make it much easier to work with.

I settled upon a Kusudama Flower Ball.
Representing both Fire and Ice!

Each flower consists of 5 individual petals and there are 12 flowers in all...
60 petals in all!


But I wanted a fun way to display it as well....
I stamped the "Love" image twice, once on the warmer section of the printed design and once on the icy area.  They were both matted with the red pattern paper from the kit and strung on the black cord.
 
The flower ball comes next then the sentiment about love below.

 
I tried to spin it so you could see multiple angles...


Here's the top portion....

 
and the stamped sentiment hanging below the ball...
(warm side)

 
I hope you've enjoyed this project and it inspires you to think outside of the Club Scrap box.
 
Your next stop on the hop is
 
If you get lost along the way you can always start at
for the full listing of participants.
 
Have a fun time hopping!


Tuesday, November 26, 2013

Origami Kusudama Flower Step by Step Photo Instructions

Tomorrow is the Club Scrap's November Fire & Ice Blog Hop!
If you've not seen this months kit you're going to love it...
 
 
It's got a bit of Asian flair to it so I really wanted to run with that theme and create something special.  I'm not going to show you my project just yet ~ you'll have to wait till tomorrow for that but it is an ambitious one that incorporates the Origami Kusudama Flower. 
 
Today I wanted to share step by step instructions to create one of these flowers....
 
Normally origami pieces are made with very thin colorful papers but I used the Club Scrap cardstock which if you've ever seen any of their kits...the paper can be quite thick.  I lucked out ~ some of the paper in the kit was printed on glossy cardstock so it was a bit more manageable but I did fold quite a bit of the heavy stuff.  Needless to say my fingers are sore & tired but I think the finished project was well worth it.
 
To begin start with a 4x4 square of paper.
 
 
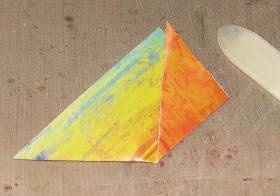
Fold it in half to form a triangle.
 
 
Fold the right corner so it's tip touches the existing triangle tip.
Crease the folded line.
 
 
Fold the left corner up towards the center as you did with the right side.
Crease that fold.
 
 
Take the tip of the right side small triangle and fold it back onto it's self so the center line sits on the folded crease.  Crease this new fold.
 
 
Repeat the previous step on the left side and crease.
 
 
Lift the right side fold and open it up,
 
 
now flatten it out so you have a kite shape.
Crease each of the lines again.
 
 
Repeat on the left side.
 
 
Your paper should now look like you have 3 kites lined up side by side.
 
 
Fold the tip of the right hand kite over and crease.
 
 
Fold the tip of the left kite over and crease.
 
 
Now following the original crease line, fold the right hand kite in half.
Re-crease this fold.
 
 
Repeat on the left side.
 
 
Apply glue to the right hand flap as shown.
 
 
Bring the two sides together,
 
 
And clip to hold both sides together until dry.
 
 
Once it's dry you can remove the clip and pop the flower section open.
You now have the start of a flower.
 
 
Repeat the above steps to create 4, 5  or 6 petals.
Once you've got all of your petals assembled you can glue them together.
I'm making a 5 petal flower for this example.
 
 
And here's the completed flower.
Front view...
 
 
Side view...
 
 
Are you interested in seeing the rest of it?
You'll have to check back in tomorrow to see what I did with this little beauty!