
2014 Technique Calendar
July
Embossed Dryer Sheet Technique
Some of you may be familiar with the dryer sheet technique - basically you stamp an image onto cardstock, color it then cover it with a used dryer sheet and sprinkle on a layer of glitter. Well, I decided to switch things up a bit and actually stamp & emboss the dryer sheet to see what would happen. It worked and I'm ready to share it with you!
Supplies:
Tag
Dryer Sheet (used)
Bold Image Rubber Stamp (fine lines get lost in the loose weave of the dryer sheet)
Embossing Ink
Embossing Powder
Clear Glitter
Glue Stick
Embellishments to finish off your Calendar Page
Instructions:
1. The first thing I did was to trace my tag onto scrap paper so I would have a stamping guide for my dryer sheet. I then placed my dryer sheet over the template ~ you can temporarily tape it down if you'd like...I didn't.
TIP: To get most of the wrinkles out of the dryer sheet I simply heated it with my heat tool. When hit with the warm air the winkles relaxed right out.

2. I inked up my stamp with a bit of Distress Ink then embossing ink. I used the Distress Ink to help with color placement...you'll see what I mean in a step or two.

3. Stamp the image onto the dryer sheet using the template underneath as a guide.

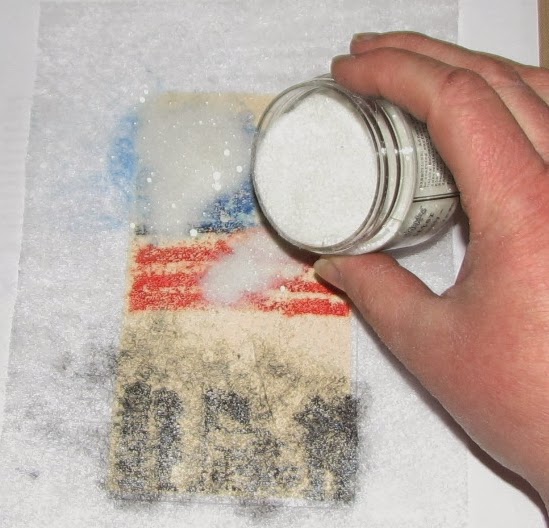
4. Now sprinkle with embossing powder(s). I am using multiple colors but you could use one, two, three, etc. Totally up to you!

Once you have all of the areas covered with embossing powder, shake off the excess. You will see I added a second image to the bottom... not a good idea...

5. Heat to melt the powders. Don't worry about hurting the dryer sheet. It's made to withstand the warm temps. It doesn't take long at all to melt the powders.

and here's how it turned out...love the flag, hate the bottom image! I decided to make it work and not start over.

6. (optional) Stamp an image or two on your tag at this time...I didn't even think about it because I was so excited to get that flag on there. Now looking back I have a really cool eagle stamp that would have been great under my design but what are ya gonna do...
7. Cover the tag with a healthy layer of glue stick adhesive. You want quite a bit because you want it to ooze through the dryer sheet.

8. Place the dryer sheet over the adhesive and smooth as best you can.
9. Sprinkle clear glitter over the tag. I added quite a bit then smooshed it into the tag so it would get a good hold of the glue under the dryer sheet.
Shake off the excess and you get a really great looking glittery tag!

10. (Optional) to help ensure I had a good adhesion of the glitter I covered the tag with a second piece of scrap paper and used my brayer to press the glitter into the tag.

Now your tag should really sparkle! I love how it looks....

I tried to show more of the sparkle...it doesn't show up well in photos but it looks spectacular in person.

11. Finish off your tag with desired embellishments and calendar.
And here's my tag!!!
I LOVE how the fibers of the dryer sheet come out in the embossing...really fun and unique look.
And who doesn't love glitter :) Makes my heart sing - LOL!!

Stamp Credits: Stampers Best
I went with a modern image of people for this tag but I thought it was very appropriate.
Remember the nasty embossed image I messed up on...
with these guys in the foreground it looks like it's supposed to be there!
How fun is that?
Hope you're all carving out a little ink time for yourself...
nothin' like a little ink on your fingers to help make it a great day!
Ink on my friends...
Ink On!!
Oh how amazing and appropriate! I love your tag and the technique is gorgeous. Thank you so much for creating this and coming up with so many fabulous techniques.
ReplyDeleteRoni, I love your can do spirit! I love this technique! Who would have thought that the blurred image of the soldiers would create such dramatic shadowing for you second stamped image...amazing!
ReplyDeleteHello Roni, thanks for the wonderful technique ideas. I'll start within short with my calender. Please could you explain what exactly a dryer sheet is ? I'm German and didn't heart this before. Thanks in advance :)
ReplyDeleteFreakin' awesome tag and super tutorial. I'll be trying this technique for sure. The idea of stamping the eagel directly on the tag should look pretty awesome.
ReplyDelete