
(Originally posted 2-13-2008)
Today I wanted to share with you a technique I call "Color Sticks". It's my own twist on the technique known as "bargello". Basically, bargello is slicing a piece of pattern paper or a stamped image into several pieces then layering these individual pieces in a stair-step fashion.
Color Sticks takes it a step further with the magic of Alcohol Inks! One of my absolute favorite color mediums, you will see what a striking effect the inks have on the finished cards :)
Supplies:
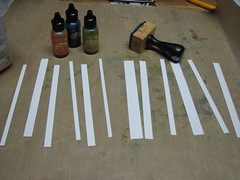
Adirondack Alcohol Inks - Ranger
Adirondack Alcohol Ink Blending Tool & Felts - Ranger
Non-Stick Craft Mat - Ranger
Glossy Cardstock - Ranger
Glue Stick
Cardstock
Trimmer
Instructions:
1. Trim several pieces of glossy cardstock in various widths. Why cut first? Well I do it this way so there is no waste. If you ink a solid section of glossy cardstock you may end up with excess for your particular project. This way, there is no waste! You ink only what is needed and don't end up with a pile of already inked cardstock you have to find a use for.
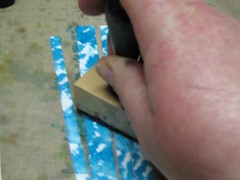
2. Apply alcohol inks to the strips of glossy cardstock. For this example I used Butterscotch, Lettuce and Stream.
3. On a plain piece of cardstock, apply a generous amount of glue stick adhesive. I know I know, glue stick? Yes...I like to use a glue stick for this particular step rather than other adhesives because you will need to be sure that the entire length of each strip is secured to the backing cardstock. If the entire strip is not adhered to the backing paper it will cause problems when it comes time to cut.
4. Once you have applied the glue stick to the backing paper, start laying the individual strips down. You need to make sure that they are butted snugly next to each other leaving no spaces.
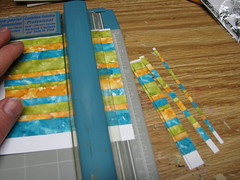
Once you have attached all of your strips to the backing paper you will be left with something that looks like this. It needs to be set aside to dry completely.
NOTE: I like to place a few books on top of the piece while it's drying to ensure there is no curling or warping of the finished piece.
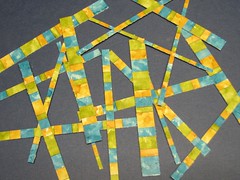
5. Now you are ready to make your "Color Sticks"! Simply slice your creation in various widths ~ everything from very thin to wider pieces will work. You just want to make sure you have lots of sizes to choose from. You will be left with a pile of Color Sticks like this! You may be asking ... now what?
Color Sticks takes it a step further with the magic of Alcohol Inks! One of my absolute favorite color mediums, you will see what a striking effect the inks have on the finished cards :)
Supplies:
Adirondack Alcohol Inks - Ranger
Adirondack Alcohol Ink Blending Tool & Felts - Ranger
Non-Stick Craft Mat - Ranger
Glossy Cardstock - Ranger
Glue Stick
Cardstock
Trimmer
Instructions:
1. Trim several pieces of glossy cardstock in various widths. Why cut first? Well I do it this way so there is no waste. If you ink a solid section of glossy cardstock you may end up with excess for your particular project. This way, there is no waste! You ink only what is needed and don't end up with a pile of already inked cardstock you have to find a use for.
2. Apply alcohol inks to the strips of glossy cardstock. For this example I used Butterscotch, Lettuce and Stream.
3. On a plain piece of cardstock, apply a generous amount of glue stick adhesive. I know I know, glue stick? Yes...I like to use a glue stick for this particular step rather than other adhesives because you will need to be sure that the entire length of each strip is secured to the backing cardstock. If the entire strip is not adhered to the backing paper it will cause problems when it comes time to cut.
4. Once you have applied the glue stick to the backing paper, start laying the individual strips down. You need to make sure that they are butted snugly next to each other leaving no spaces.
Once you have attached all of your strips to the backing paper you will be left with something that looks like this. It needs to be set aside to dry completely.
NOTE: I like to place a few books on top of the piece while it's drying to ensure there is no curling or warping of the finished piece.
5. Now you are ready to make your "Color Sticks"! Simply slice your creation in various widths ~ everything from very thin to wider pieces will work. You just want to make sure you have lots of sizes to choose from. You will be left with a pile of Color Sticks like this! You may be asking ... now what?
For the finished examples and step-by-step photos be sure to check out the original post - Color Sticks.
Love the color sticks, Roni! I need to give this one a try!
ReplyDeleteHi Roni -
ReplyDeleteI've had a blast going through all your techniques today. I will be trying quite a few of these. Thank you so much for reposting them.
Elaine Allen
I actually love the way it looks when they're butted up against eachother and in a stairstep pattern , in a bargello pattern! This is a great way to use those scraps of glossy paper that I have leftover!
ReplyDeleteThanks for revisiting these techniques Roni! I missed a few of them the first time around and am tickled to find even more new inspiration!
ReplyDeleteI think I try making a Christmas tree shape.
ReplyDeleteOoh, I want to try some of these yummy techniques, thanks so so much for sharing. ~xoxo
ReplyDelete