

Just a few words about mounted stamps before we begin. We all know how precious space is when it comes to crafting...be it supplies, tools or just space to work it is usually at a premium. When I started rubber stamping wood mounted stamps were really the only option out there. I kept all of them stored in rolling carts such as these. I ended up with two of these carts completely filled and piles of stamps usually falling off of the tops of them. It made stamping a chore...first just trying to locate the stamps I wanted to use then trying to get them out without having to unload half the stamps in the drawer. It just wasn't any fun. Needless to say my stamp sat un-loved while I found other items to use in place of them.
NOW ~ I have most of my stamps unmounted stored in 3 ring binders which take up a fraction of the space! All of my stamps are cataloged by manufacture so I know exactly where each stamp is. (Note - Some people choose to store by themes instead of mfg.) There are other ways to store your UM stamps such as CD jewel cases; specially made folders, pizza boxes, etc. The 3-ring binders are just what works best for me.
How To Un-Mount Rubber Stamps....
Supplies:
The only items you will need in way of supplies are wood mounted stamps (to unmount), access to a microwave or embossing/heat gun and possibly a pair of gloves. The gloves are to protect your fingers from the warm rubber/glue. I never use them but some people with sensetive skin may want to.
Instructions:
1. Place rubber stamp to be unmounted on a heat proof surface. I like to use my Non-Stick Craft Mat when I un-mount stamps. (Note - in the photos I've got a sheet of cardstock under my stamps just for the photos. I wouldn't suggest it if you were unmounting several stamps at one time.)
2. Heat stamp using embossing or heat gun. 15 - 20 seconds will do the trick. This is to soften the adhesive which holds the stamp to the wooden block. You may also heat your stamps in a microwave oven for a few seconds. I have been told it works just as well but have never personally tried it.

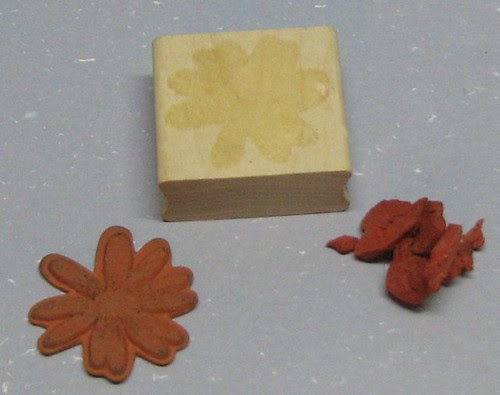
3. Carefully pull up the edge of your stamp and begin to peel off the block. You will notice that either the stamp pulls up from the foam or the stamp and foam pull off of the block. It just depends on the quality of the foam and adhesive used when manufactured.

If the rubber die pulls off of the foam and block then you're finished! Your stamp is ready to be used in whatever fashion you desire. It can be used as is by applying a bit of double stick adhesive to an acrylic block for temporary mounting or the rubber die could be coated with Aleene's Tack it Over and Over or mounted on EZ Mount Foam for a more permanent type of mounting system.
4. If your foam and rubber die came off of the wood block then you'll need to do a bit more heating and peeling to remove all of the foam from the back of the rubber die.

5. Now you're all set! You now have a pile of gooey foam to discard, a nice freshly unmounted rubber stamp and the wooden block!
You're thinking...great, I've got all my stamps unmounted NOW what do I do with all of those blocks?!?!?

Well, you could give them to your children to play with or toss them out BUT....I've got a better solution ~ use them as a tiny canvas!!! Make something out of them! I've already shared one project not too long ago where I used a wooden stamp mount as the base for my project and in the coming days I'll be sharing a few more!

So be sure to stop back in and check em all out!!
Till then...go un-mount some stamps!
That is an awesome use for a wood block! I am so glad you posted this Roni as I have just started undertaking the arduous task of unmounting all my rubber stamps. I have used the microwave and it works well if you heat for about 10 seconds and then use a pot holder to pick up the wood as it will be warm to the touch. I also purchased some 8 X 10 acrylic sheets from Lowe's and am mounting the stamps on these sheets by theme and filing them in three ring sheet protectors. Thanks again for sharing Roni!!
ReplyDeleteHave already unmounted some of my stamps but Roni, I tell you, you're awesome. I would have never thought of using the wood for a project. Thank you for sharing that.
ReplyDeleteThank you so much for sharing this and taking the trouble to take all the photographs - it is MUCH appreciated, and what a great idea!
ReplyDeleteThanks so much for sharing this tutorial! And I love what you made with the wood block! Gorgeous!
ReplyDeleteOk, I love you even more now! I was just thinking how do I get rid of the wood and keep the stamp?! I think unmounted stamps are ideal and this process is fantastic.
ReplyDeleteTHANK YOU!!!
I never thought about using stamp blocks like that. You are a genius Roni!! My dh usually takes my blocks and uses them for his toy making. I may have to put an end to that! LOL
ReplyDelete